Right royal fondant fancy
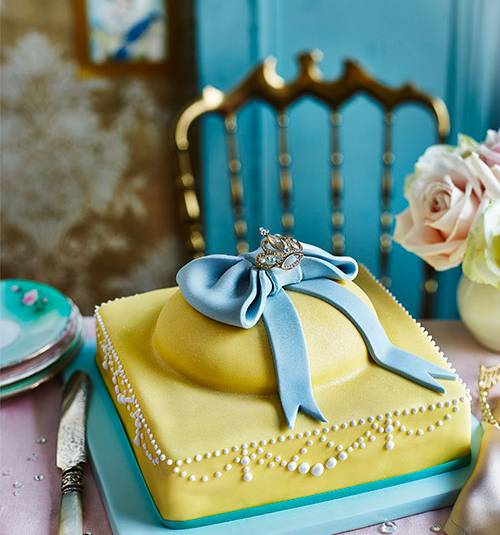
Right royal fondant fancy

Kim Morphew
London-based food stylist and writer Kim Morphew has been contributing to Sainsbury's magazine since 2008. She is creator of the children's cookery book and baking range, The Kookey Chefs.
Kim Morphew
London-based food stylist and writer Kim Morphew has been contributing to Sainsbury's magazine since 2008. She is creator of the children's cookery book and baking range, The Kookey Chefs.
Ingredients
You will need
- a deep 20cm square cake tin
- 16cm diameter/600ml bowl
- 25cm square cake board
- a palette knife
- fine writing nozzle
- disposable piping bag
- 80cm length of 15mm ribbon
- crown brooch (optional), which you can buy from royalcollectionshop.co.uk
For the cake
- 250g butter, softened, plus extra for greasing
- 350g caster sugar
- zest and juice of 2 lemons
- 5 medium eggs, beaten
- 75g plain flour, sifted
- 100g full-fat natural yogurt
- 250g self-raising flour, sifted
For decorating
- 200g butter, softened
- 100ml milk
- 750g icing sugar, sifted
- juice of 2 small lemons (50ml)
- 200g lemon curd
- 500g ready to roll soft white icing
- 250g ready to roll yellow icing
- cornflour, for dusting
- 100g royal icing sugar, sifted
- Cake Decor gold glitter spray
For the bow
- 125g white flower and modelling paste
- ¼ tsp each Dr Oetker Sky Blue, Lime Green and Ultra Violet gel food colours
Step by step
- Preheat the oven to 180°C, fan 160°C, gas 4. Grease a deep, 20cm square cake tin with butter and line the base with baking paper. Put the butter, 300g sugar and lemon zest in a large bowl and whisk together until light and fluffy.
- Gradually whisk in the eggs, beating well between each addition, until combined. Add the plain flour and yogurt and continue to whisk until combined. Don't worry if it starts to curdle. Fold in the self-raising flour until smooth and combined. Spoon into the prepared tin, level the top and bake in the oven for 55 minutes or until golden and a skewer inserted into the centre comes out clean. Remove from the oven and leave to stand for 10 minutes in the tin.
- Meanwhile, put the lemon juice and remaining sugar into a small pan and gently heat until the sugar dissolves, then cool slightly. Prick the cake all over, right to the bottom, with a thin skewer, then drizzle the syrup over the top, allowing it to soak in. Leave the cake in the tin until cold.
-
How to decorate:
While the cake is cooling, make the buttercream. In a large bowl, whisk together the butter, milk and icing sugar until light and fluffy. Add the lemon juice and whisk again. Line a 16cm diameter/600ml bowl with clingfilm. Spoon 600g buttercream into the bowl and level the top. Put in the fridge for at least 1 hour until your cake is cold or until you are ready to decorate. Reserve the remaining buttercream at room temperature.
- Remove the cake from the tin, discard the baking paper and put onto the cake board. With a serrated knife, carefully cut the cake in half, horizontally. Spread the just-cut surface with the lemon curd and sandwich the two halves back together. With a palette knife, cover the cake with the unchilled buttercream, this is a thin crumb layer and helps to smooth out the sides and top. Chill the cake in the fridge for 30 minutes.
- Meanwhile, knead together the white and yellow icing until smooth and evenly coloured, then wrap in clingfilm. If making the bow, knead the modelling icing with the blue, green and violet food colouring to make a duck egg blue, or whatever colour you fancy. Wrap in clingfilm and set aside.
- Remove the cake and the bowl of buttercream from the fridge. Lift the buttercream out of the bowl using the clingfilm and put on top of the cake in the centre, dome side up, then discard the clingfilm.
- Dust a clean surface with a little cornflour. Roll out the pale yellow icing until about 35cm square, 5mm thick. Using the rolling pin to help lift the icing, lay it over the top of the cake, ensuring it is central. Using your hands, smooth the icing down over the sides and corners. Trim the icing from the base of the cake.
- Whisk the royal icing sugar in a bowl with 1 tablespoon cold water, until stiff. Put a writing nozzle in a piping bag and fill with the icing. Carefully pipe dots all around the top edge of the cake in a neat line. Then pipe dots in a pearl necklace pattern, making some of them larger as you go. It really is up to you how elaborate you are! See the instructions below on how to create the large bow decoration, which you can place on top of the cake, if you like.
-
Finally, spray the cake all over with a little gold glitter spray, secure a ribbon around the base and pop the crown brooch on the bow, if using.TipHow to make the bow:
1. Roll out the duck egg blue icing on a little cornflour until about 5mm thick. Cut out a 22cm x 7cm rectangle.
2. Then, fold the 2 ends over to meet in the middle and pinch or ruffle together to create the bow.
3. Cut a strip of icing and wrap around the pinched section. Reroll the trimmings and cut out 2 lengths, about 17cm x 2cm.
4. Cut one ribbon shorter than the other and cut a ‘V’ in the ends. Stick the ribbons and bow to the cake using a little water.


