Food
How to make proper French bread
by Lucy Jessop
Last week I headed to traditional French bakery PAUL to try the new Bread Masterclass. As a lover of proper crunchy French bread I wanted to find out how they make it so different to a classic super soft English Farmhouse. Here's what I learnt...
Richard, the tutor of our mixed-ability group (first-time bread-makers, sourdough enthusiasts and me!), told us that making French bread is as easy as A,B,C...
'Once you've learnt the basics, anyone can make bread – as long as you respect these main principles...'
STEP 1: The basic ingredients
We started off with flour, yeast, salt and cold water. Being a stickler for following a recipe to a T (especially when baking cakes), I was surprised when Richard explained that you can make bread without a recipe once you fully understand the process. 'It's really about the proportion of liquid to flour, not exact quantities,' he says. 'The amount of yeast doesn't need to be precise because it replicates, and salt is a matter of personal taste.'
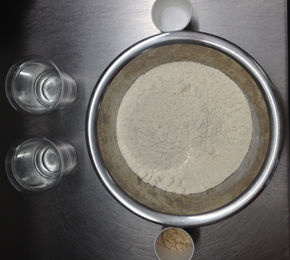
TOP TIP Make sure you add the salt and yeast on opposite sides of the bowl – otherwise the salt can kill the yeast.
At this stage, there are two main differences between English and French bread-making. The French method uses more water to make a wetter dough, creating a lighter texture and less yeast, which is why later in the process the dough needs at least four hours to ferment – whereas the English method tends to use more yeast and a quicker proving process.
STEP 2: No knead for technique
Of course, there's a technique to kneading, but we learnt that really any kind of work to the dough (slapping, patting and stretching) will do the job – the 'job' being to activate the gluten in the dough. This, Richard explained, is what transforms this basic mix of flour, water, salt and yeast into bread. 'Don't be afraid to give it some welly,' he says.
We learnt how to stretch and fold the dough – this is the most efficient way to knead and, if done properly, will take about 8-10 minutes. If you haven't quite mastered it, don't worry – you will get there eventually, it'll just take a little longer.
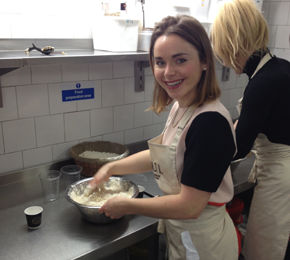
TOP TIP It's important not to add too much extra flour when kneading as this will change the texture. It will get less sticky in time, we promise – be patient!
STEP 3: Fermentation (time and temperature)
We left our dough to ferment for four hours at about 28°C. For the French method, during this time, you'd normally give the dough three or four 'turns' (folding the dough over to introduce some oxygen and keep the fermentation going). This is another key difference between English and French bread-making. Here in the UK, we tend to 'knock back' the dough more, whereas the French method works hard to retain and encourage the 'sponge' by knocking back without taking the fermentation gas out of the dough.
TOP TIP Time and temperature are important here – you can pause the fermentation process by freezing the dough to use at a later date. Make sure the dough isn't left somewhere too hot, or the yeast will die.
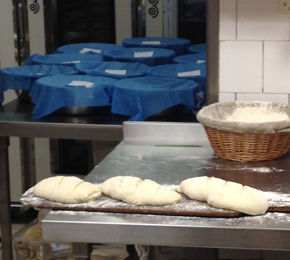
STEP 4: Resting and baking
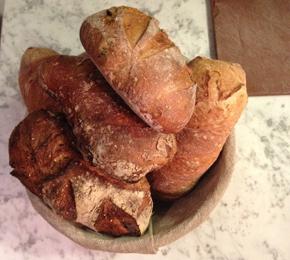
After dividing the dough and shaping it, we left it to rest for a further 30 minutes (to check it's ready to bake, press it with your finger ¬– it should bounce back). We then slashed the top of each loaf with a sharp knife, before sliding them onto the super-hot stone surface of the preheated oven (about 250°C). A shot of steam is injected into the oven to help create a crisp, rather than hard, crust and give the loaves a glossy finish. The loaves then bake for about 30 minutes until golden and crisp (tap the base of the loaf – it should sound hollow if it's ready).
TOP TIP When making bread at home, pour a little boiling water into a shallow roasting tin in the base of the oven to create steam.
You can book Bread Masterclass at PAUL, which run every Tuesday from 6pm until 8.30pm at either Paul Bankside or Paul Covent Garden. There are a maximum of seven people in each class.
What's included? A PAUL baker's apron, recipe booklet, certificate and PAUL 'Sac à Pain' to store your own freshly baked bread, as well as some dough you can freeze and then defrost, shape and bake in your own time. You'll also enjoy a light supper with wine.


