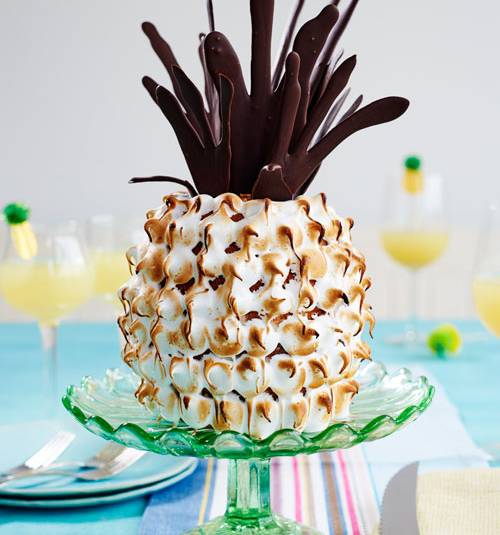
Pineapple and coconut ‘pineapple’ cake
Serves: 14
This recipe contains partially cooked eggs. / Recipe by Angela Romeo / Recipe photograph by Charlie Richards
Pineapple and coconut ‘pineapple’ cake
Serves: 14
See more recipes
Nutritional information (per serving)
Calories
526Kcal
Fat
28gr
Saturates
18gr
Carbs
61gr
Sugars
45gr
Fibre
3gr
Protein
6gr
Salt
0.3gr

Sainsbury's magazine
Our team of trained chefs and skilled food writers love cooking up everything from innovative seasonal recipes or clever shortcuts, to step-by-step guides and classic recipes for friends and readers alike.
Sainsbury's magazine
Our team of trained chefs and skilled food writers love cooking up everything from innovative seasonal recipes or clever shortcuts, to step-by-step guides and classic recipes for friends and readers alike.
Ingredients
For the sponge
- 1 x 432g tin pineapple chunks in juice, drained
- 250ml coconut milk
- 200g soft unsalted butter
- 200g golden caster sugar
- 3 large eggs, beaten
- 300g self-raising flour
- 50g desiccated coconut
For the buttercream filling
- 50g soft unsalted butter
- 100g icing sugar
- 1 tbsp rum (optional)
For the chocolate fronds
- 3 x 100g bars Taste the Difference cook’s Belgian dark chocolate, 60% cocoa solids, melted and tempered (see Kitchen Secret)
For the meringue
- 2 large egg whites at room temperature
- 110g caster sugar
- ¼ x 5g sachet cream of tartar
Step by step
Get ahead
Make the sponges and chocolate fronds the day before, assemble and finish on the day. Once the meringue is brûléed it is stable for 8-10 hours at room temperature. The cooked, undecorated sponges can be frozen.
- Preheat the oven to 180°C, fan 160°C, gas 4. Grease 2 x 500ml pyrex bowls with the vegetable oil (if you don't have 2 bowls you can bake 1 cake at a time, keep the unbaked cake mixture covered with clingfilm between bakes).
- Using a stick blender, purée the pineapple chunks and set aside.
-
Pour the coconut milk into a large saucepan, add the butter and heat until it has melted. Remove the saucepan from the heat. Using a hand whisk, whisk in the sugar, then the eggs. Sift over the flour and fold through the butter and coconut mix. Whisk gently to remove any lumps, if necessary.TipTo temper chocolate, break the chocolate into pieces and then melt three quarters of it over a pan of simmering water, stirring, until it reaches 47°C on a digital thermometer. Remove the bowl from the heat and add the remaining chocolate. Stir until the chocolate pieces have melted and the temperature is 31°C.
- Gently stir the puréed pineapple and the desiccated coconut through the cake batter.
- Divide the mixture between 2 bowls, being sure to leave a 1cm gap at the top of each, and bake for 45-50 minutes until cooked through when tested with a skewer. Leave to cool in the bowls for 10 minutes. Loosen the sides with a palette knife, remove from the bowls and place on wire racks to cool completely. If the cake tops aren't level, use a serrated knife to trim so they are flat.
- For the buttercream filling, whip the butter with an electric hand whisk and gradually add the icing sugar until combined. Add the rum (if using) and whisk until combined. Sandwich the two cakes together with the buttercream, reserving a small blob. Use this to secure the cake onto a heatproof serving board.
- For the chocolate fronds, draw a selection of palm shapes in various lengths, from 11cm-25cm, on a piece of paper. Using sheets of baking paper, trace over the shapes (they will act as a guide when piping the chocolate). Lay the baking paper on baking sheets (turn over so the pen or pencil is on the underside).
- Trace 5 x 5cm finger shapes, side by side, onto a thin strip of baking paper. Lay next to a rolling pin.
- Put a small round nozzle (around 4mm diameter) in a piping bag and fill with the melted tempered chocolate. Working quickly, pipe around the frond shapes. Using the same nozzle, fill in the outlines with the chocolate, then wiggle the baking paper gently to allow the chocolate to level and fill in any holes. Set aside to dry.
- Repeat with the finger shapes but allow them to dry draped over the rolling pin. Set aside.
- For the meringue, in a dry, clean heatproof bowl, whisk together the egg whites, sugar and cream of tartar until combined. Place over a pan of simmering water (ensuring the base of the bowl does not touch the water). Whisk constantly until the sugar is dissolved and the whites are warm to the touch. This should take 3-4 minutes. Rub between your fingers to test that all granules are dissolved.
- Remove the bowl from the heat. Whip the mixture with a handheld electric whisk, starting at a low speed and gradually increasing the speed to high until stiff, glossy peaks form. This should take around 7-8 minutes.
- Before piping the meringue onto the cake, take a small sharp serrated knife and make slim indentations in the top of the cake – around 3cm deep. These will make it easier to push the chocolate fronds into cake.
- Put a 15mm round nozzle in a piping bag and pipe small rounds all over the base, working up to the top of the cake row by row (leave the very top of the cake exposed). Use a blow torch to brown the meringue.
- Insert the chocolate palm shapes into the top of the cake, then insert the bent chocolate pieces around the base of the palm shapes and serve.


