Watercolour cake
Serves: 16
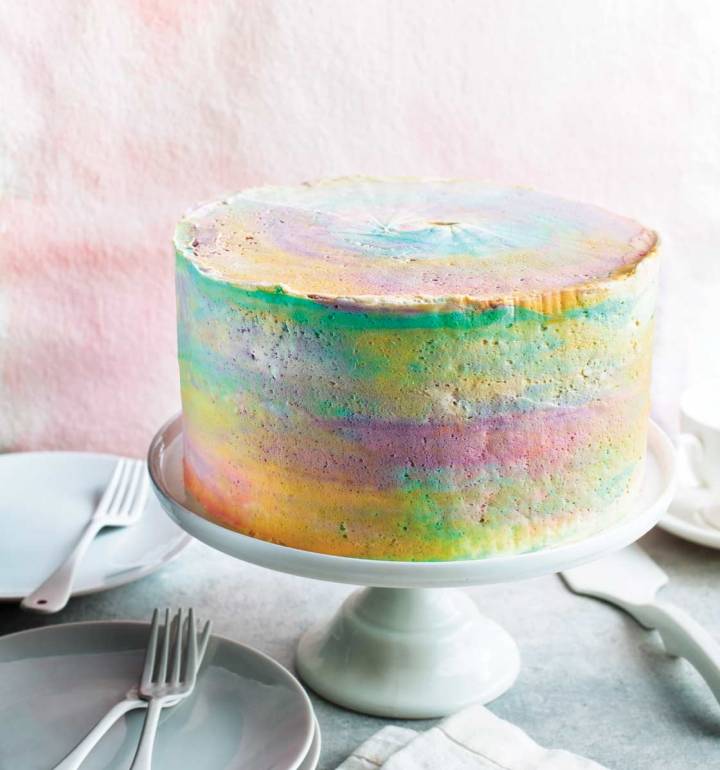
Recipe photograph by Kris Kirkham
Watercolour cake
Serves: 16
See more recipes
Nutritional information (per serving)
Calories
696Kcal
Fat
37gr
Saturates
23gr
Carbs
85gr
Sugars
70gr
Fibre
1gr
Protein
5gr
Salt
1.1gr

Sainsbury's magazine
Our team of trained chefs and skilled food writers love cooking up everything from innovative seasonal recipes or clever shortcuts, to step-by-step guides and classic recipes for friends and readers alike.
Sainsbury's magazine
Our team of trained chefs and skilled food writers love cooking up everything from innovative seasonal recipes or clever shortcuts, to step-by-step guides and classic recipes for friends and readers alike.
Ingredients
For the sponges
- 300g very soft salted butter, plus extra for greasing
- 300g golden caster sugar
- 2 tsp vanilla bean paste or extract
- 300g self-raising flour
- 2 tsp baking powder
- 6 medium eggs, at room temperature
For the frosting
- 500g very soft unsalted butter
- 2 tsp vanilla bean paste or extract
- 1kg icing sugar, sifted
- 4 shades of food colouring gels or paste (check that it's suitable for vegetarians)
- 120g raspberry jam, to fill
Step by step
Get ahead
Make the buttercream the day before, and leave covered at room temperature. Make sure to give it another whip before you use it again so it gets back to its soft texture. The finished cake keeps for about 2 days in an airtight container. The whole decorated cake also freezes well, for up to 1 month. Defrost at room temperature for 24 hours.
- Preheat the oven to 200°C, fan 180°C, gas 6. Grease and line the base and sides of 3 x 20cm round cake tins. If you don’t have 3 tins, you can just wait for each one to cool, then wash and re-line the tin before baking another.
- In the bowl of a stand mixer with a paddle beater attachment, or a large bowl using an electric hand whisk, beat the butter, sugar and vanilla on fast speed for 3 minutes until light, pale and creamy. Sift the flour and baking powder together in a separate bowl.
- Add the eggs to the butter mixture, one at a time and beat until combined on a slow speed. Lastly add the flour mixture in 3 batches, beating slowly until only just mixed in.
- Pop a third of the batter mix into each tin, spread out, then bake for 20-22 minutes until the sponges are pale golden and completely cooked in the centre. Cool in the tin for 5 minutes, then turn out onto a cooling rack and allow to cool.
- For the frosting, put the butter and vanilla in the bowl of a stand mixer with the paddle beater attached, or use a large mixing bowl with an electric hand whisk, and beat on high for 2-3 minutes or until very smooth and pale. Gradually add the icing sugar, about a quarter at a time, with 1 tablespoon of just-boiled water each time. Beat each addition on slow at first so the icing sugar doesn’t puff up everywhere, then turn up to high speed for 1 minute or so. When your icing is creamy and fluffy, cover and set aside at room temperature.
- To assemble, place 1 sponge onto your stand or plate; spread with half the jam. Spread the underside of the next sponge with frosting; sandwich together. Repeat with the other 2 sponges.
- Using a palette knife or scraper, spread some frosting all around the sides of the cake, then the top. Clean the blade and go around again to smooth off the excess. Chill for 1 hour.
- Put about 3 tablespoons of frosting in a small bowl; tint it a light pink. Repeat with 3 further shades of your choice in separate bowls. Add random splodges of coloured and white frosting on the top and sides of the cake. Go over the top with a palette knife in a swooping circle, to flatten the icing and drag the colours across. As the frosting builds up on the knife, wipe off onto a spare bowl. Go around the side with a scraper or palette knife in one sweeping motion to flatten and swirl the colours. Try not to go around more than twice or you will lose the effect of different colours and it will look muddy. Voila!